28/01/2014 MCAFEE SECURE 認證的網站

https://www.mcafeesecure.com/RatingVerify?ref=www.HongKongCupid.com

2013年6月10日 星期一

*Android设计模式--之策略模式 *(建造者模式)&*进行Android单元测试***~!

** *Android设计模式--*
*之策略模式 **~!*(建造者模式)&**
进行Android单元测试***~!

* 1 public abstract class Animation implements Cloneable { 2     Interpolator mInterpolator; 3     // 通过set方法注入    
4     public void
setInterpolator(Interpolator i) { 5          mInterpolator = i; 6      } 7   8     public boolean getTransformation(long currentTime,

Transformation outTransformation) { 9         // ... ... 10         // 具体调用
11         final float interpolatedTime =
mInterpolator.getInterpolation

(normalizedTime); 12         applyTransformation(interpolatedTime, outTransformation); 13        // ... ...
14
    } 15   16      // 缺省实现,是个小技巧,顺便提下,这个不是重点
17      protected void
ensureInterpolator() { 18          if (mInterpolator == null) { 19              mInterpolator = new AccelerateDecelerateInterpolator(); 20          } 21      } 22   23 }                                  *


*策略模式其实特别简单(听到这句话,
大家是不是心里一下子放松了?)。
比如排序,官方告诉大家我这里有一个
排序的接口ISort的sort()方法,然后民间
各尽其能,实现这个
排序的方法:冒泡,快速,堆等等。
这些方法就是“不同的策略”。
然后,某个模块下,需要一个排序方法,
但是暂时不能指定具体的sort方法
(出于扩展的考虑),就需 要使
用ISort接口了。
最后,具体什么场景下,传入什么具体的
sort方法,实现灵活的排序。
这就是策略模式!
下面,我们分析Android中的动画是如何使
用策略模式的。
1. 意图
定义一系列的算法,把它们一个个封装起来,
并且使它们可互相替换。
策略模式使得算法可独立于使用它的
客户而变化。
2. 结构图和代码
Animation不同动画的实现,主要是依
靠Interpolator的不同实现而变。
  
定义接口Interpolator:
复制代码
 1 package android.animation; 
 2   
 3 /** 
 4  * A time interpolator defines the rate 
of change of an animation. This allows 
animations 
 5  * to have non-linear motion, such as 
acceleration and deceleration. 
 6  */ 7 public interface Interpolator { 
 8   
 9     /** 
10      * Maps a value representing the 
elapsed fraction of an animation to a value 
that represents 
11      * the interpolated fraction. This 
interpolated value is then multiplied by 
the change in 
12      * value of an animation to derive 
the animated value at the current elapsed 
animation time. 
13      * 
14      * @param input A value between 0 
and 1.0 indicating our current point 
15      *        in the animation where 0 
represents the start and 1.0 represents 
16      *        the end 
17      * @return The interpolation value. 
This value can be more than 1.0 for 
18      *         interpolators which 
overshoot their targets, or less than 0 for 
19      *         interpolators that 
undershoot their targets. 
20      */21     float getInterpolation(float input); 
22 }
复制代码
我们以AccelerateInterpolator为例,实现
具体的策略,代码如下:
复制代码
 1 package android.view.animation; 
 2   
 3 import android.content.Context; 
 4 import android.content.res.TypedArray; 
 5 import android.util.AttributeSet; 
 6   
 7 /** 
 8  * An interpolator where the rate of 
change starts out slowly and 
 9  * and then accelerates. 
10  * 
11  */12 public class AccelerateInterpolator 
implements Interpolator { 
13     private final float mFactor; 
14     private final double mDoubleFactor; 
15   
16     public AccelerateInterpolator() { 
17         mFactor = 1.0f; 
18         mDoubleFactor = 2.0; 
19     } 
20   
21     /** 
22      * Constructor 
23      * 
24      * @param factor Degree to which the 
animation should be eased. Seting 
25      *        factor to 1.0f produces a 
y=x^2 parabola. Increasing factor above 
26      *        1.0f  exaggerates the 
ease-in effect (i.e., it starts even 
27      *        slower and ends evens faster) 
28      */29     public AccelerateInterpolator 
(float factor) { 
30         mFactor = factor; 
31         mDoubleFactor = 2 * mFactor; 
32     } 
33   
34     public AccelerateInterpolator 
(Context context, AttributeSet attrs) { 
35         TypedArray a = 
36             context.obtainStyledAttributes 
(attrs, com.android.internal.R.styleable. 
AccelerateInterpolator); 
37   
38         mFactor = a.getFloat 
(com.android.internal.R.styleable.
AccelerateInterpolator_factor, 1.0f); 
39         mDoubleFactor = 2 * mFactor; 
40   
41         a.recycle(); 
42     } 
43   
44     public float getInterpolation 
(float input) { 
45         if (mFactor == 1.0f) { 
46             return input * input; 
47         } else { 
48             return (float)Math.pow(input,
 mDoubleFactor); 
49         } 
50     } 
51 }
复制代码
其他的Interpolator实现在此不列举了。
如何在Animation模块实现不同的动画呢?
在这里我想提一个应用很广的概念:
依赖注入。
在Animation模块里实现不同的动画,就是
需要我们把各个Interpolator以父类或者接
口的形式注入进去。
注入的方法一般是构造函数,set方法,
注释等等。
我们看看animation类是怎么做的:
策略模式其实就是多态的一个淋漓精
致的体现。
3. 效果
(1).行为型模式
(2).消除了一些if...else...的条件语句
(3).客户可以对实现进行选择,但是客户必须
要了解这个不同策略的实现(这句话好像是
废话,总而言之,客户需要学习成本)
(4).代码注释中提到了缺省实现,可以让客
户不了解策略,也能实现默认的策略
(5).注入的方式有多种:构造函数,set方法
,注释。配置解析等等  *

{{*如何进行Android单元测试*
*
  1. Menifest.xml中加入:
    <application>中加入:
    <uses-library android:name="android.test.runner" />
    <application>外面加入:
    <uses-permission android:name="android.
  2. permission.RUN_
  3. INSTRUMENTATION" />
    <instrumentation android:name="android.test.
  4. InstrumentationTestRunner" android:targetPackage="name.feisky.android.test"
    android:label="Test for my app"/>
  5. 编写单元测试代码:必须继承自AndroidTestCase
    package name.feisky.android.test;
     
    import android.test.AndroidTestCase;
    import junit.framework.Assert;
     
    public class MyTest extends AndroidTestCase {
    private static final String Tag="MyTest";
     
    public void testSave() throws Throwable
    {
    int i=4+8;
    Assert.assertEquals(5,i);
    }
     
    public void testSomethingElse() throws Throwable {
    Assert.assertTrue(1 + 1 == 12);
    }
     
    }

执行测IntelliJ中:
      

  1.  
     
    eclipse中:右键 run as Android JUnit Test
    命令行工具:
    adb shell am instrument -w name.feisky.
  2. android.test/android.test.
  3. InstrumentationTestRunner
       
也可以新建一个测试项目进行测试
 
  1. New > Project > Android > Android Test Project.

  1. 添加测试用例类
    添加新类,基类设置
  2. android.test.ActivityInstrumentationTestCase2<HelloAndroid>
  3. 添加构造函数
    添加setUp()方法,这个方法在所有的测试之前进行
  4. 变量和测试环境的初始化。
    @Override
        protected void setUp() throws Exception {
            super.setUp();
            mActivity = this.getActivity();
            mView = (TextView) mActivity.findViewById(com.example.helloandroid.R.id.textview);
            resourceString = mActivity.getString(com.example.helloandroid.R.string.hello);
        }
  5. 添加testPreconditions()方法,检查初始化环境,
  6. 只执行一次
    public void testPreconditions() {
          assertNotNull(mView);
        }
  7. 添加单元测试
    public void testText() {
          assertEquals(resourceString,(String)mView.getText());
        }
  8. 测试 Run As... > Android JUnit Test
  9. *
    {{*Android设计模式--- 
      (之生成器模式  (建造者模式)*
    *
    建造者模式把构造和表示分离开,根据客
    户需求生产一个相应的对象。
    本来呢,我们根据Builder接口实现不同
    的具体的ConcreteBuilder,就可生产
    不同的对象了。
    但是,下面例子的只有一个Builder,
    所以也没有接口Builder,也没有其他的ConcreteBuilder。
    但是我今天要讲的例子太简单,简单到
    都不觉得是建造者模式,但是又有建造
    者模式的感觉。
    1. 意图
    将一个复杂对象的构建和它的表示分离,
    使得同样的创建过程可以创建不同的表示。
    2.结构图和代码
    android中大量的使用对话框组件,
    它的调用方法就是构建,拼接,表示。

    Builder通过setTitle(),setMessage(),
    setIcon()等方法在create()中构造出一个AlertDialogInstance对象。
    然后客户可以把把AlertDialogInstance
    对象show出去。
    针对这个例子,我有必要通过扩展一下,
    以正建造者模式之名。
    如何扩展?
    (1).创建其他的ConcreteBuilder
    (2).创建其他的ElseDialog
    (3).第1,2步决定了我们最好创建一个
    抽象的Builder
    (4).创建一个Context,把builder注入
    进去,生产不同的Dialog
    (或者其他UI)对象。
    3.效果
    (1).创建型模式
    (2).可以生产不同的Dialog,也可以生产
    其他的UI,生产的Product可以是差别很
    大的,所以也没必要为Product定义
    抽象父类。
    *                    *
          &&&&&&&&&&&&&&&&&&&&&&&&&&&&&&&&&&&&&&&&&&&&&&&&&&&&&&

        ***Linux+Apache+PHP**+MySQL服务器环境(CentOS篇) *

        ***Linux+Apache+PHP**
        +MySQL服务器环境(CentOS篇) *

        *CentOS(Community ENTerprise Operating System)是Linux发行版
        之一,它是来自于Red Hat Enterprise Linux依照开放源代码规定释出
        的源代码所编译而成。CentOS是架构LAMP
        (Linux+Apache+PHP+MySQL)的理想操作系统,具有较高的稳定性。
        本文以CentOS为例介绍linux系统下yum安装Apache+PHP+MySQL的方法*

        *2.准备工作

        2.1.登录服务器

        登录远程服务器,如果您的服务器在本地
        并安装有桌面环境,也可以直接打开服务
        器桌面,进入终端管理器。
        在windows下Putty是一款出色的liunx远程登
        录工具,打开界面如下
         
         在图中黄色框中填入服务器ip,点击打开,
        之后提示输入用户名和密码,验证成功后完
        成登录服务器。
         2.2.配置源和更新系统软件

        2.2.1.定义非官方yum库

        官方提供的软件是当前的稳定版本,但不是
        最新版本,为了更好的运行dedecms,我们需要
        一些非官方的yum源。
        /RPM-GPG-KEY-jlitka
        vi /etc/yum.repos.d/utterramblings.repo
        添加以下内容
        [utterramblings]
        name=Jason's Utter Ramblings Repo
        baseurl=http://www.jasonlitka.com/media
        /EL$releasever/$basearch/
        enabled=1
        gpgcheck=1
        gpgkey=http://www.jasonlitka.com/media/
        RPM-GPG-KEY-jlitka
        [注]vim编辑器修改文件的方法请自行百度之
         2.2.2.更新系统
        yum update
        yum upgrade
         2.2.3.检查系统软件
        检查当前系统是否已经安装了
        apache 和 mysql
        yum list installed | grep httpd
        rpm -qa | grep httpd
        yum list installed | grep mysql
        rpm -qa | grep mysql
        如果已经存在,请先卸载

        2.3.创建目录

        在这里我们约定各数据存放目录如下
        网站数据   /www/htdocs
        日志目录   /www/log
        数据库文件 /www/mysql
        运行以下命令完成目录创建
        mkdir /www/mysql
        mkdir /www/htdocs
        mkdir /www/log/php
        mkdir /www/log/mysql
        添加apache和mysql用户
        useradd -s /sbin/nologin -M apache
        useradd -s /sbin/nologin -M mysql
        创建了目录之后还需要改变目录属主和
        用户组,apache和mysql才能完成读写操作
        chown -R apache:apache /www/htdocs
        chown -R mysql:mysql /www/mysql
        chown -R apache:apache /www/log/php
        chown -R mysql:mysql /www/log/mysql

        3.安装与配置*

        *3.1. yum 安装 Apache + PHP + MySQL
        yum -y install gcc gcc-c++ autoconf make 
         aclocal libtool expat-devel libxml2-devel 
        httpd php php-devel mysql mysql-server 
        mysql-devel libevent libevent-devel mageMagick 
        ImageMagick-devel php-mysql mod_ssl mod_perl mod_auth_mysql php-mcrypt php-gd php-xml 
        php-mcrypt php-mbstring php-ldap php-pear 
         php-xmlrpc php-pecl-memcache mysql-
        connector-odbc libdbi-dbd-mysql php-
        eaccelerator*
        *3.2.配置php
        vi /etc/php.ini
        请根据自己的情况修改,这里只列出部分
        需要注意的设置
        post_max_size = 32M
        memory_limit = 256M
        allow_url_fopen = On
        upload_max_filesize = 32M
        upload_tmp_dir = /var/tmp
        log_errors = On
        error_reporting = E_ALL & ~E_NOTICE |
        E_STRICT
        display_errors = Off
        error_log = /www/log/php/php_error.log
        magic_quotes_gpc = On*
        *3.3. 配置apache
        先给默认配置文件做个备份
        cp /etc/httpd/conf/httpd.conf /etc/httpd/
        conf/httpd.conf.bak
        编辑配置
        vi /etc/httpd/conf/httpd.conf
        根据自己的需要进行修改
        DocumentRoot "/www/htdocs"  # 修改为
        默认网站主目录
        NameVirtualHost *:80
        如果安装GBK版本dedecms出现乱码,可能
        需要注释掉这个参数
        #AddDefaultCharset UTF-8
        启动apache服务
        service httpd start
        检查apache是否正常,打开浏览器,输入 
        http://localhost,如果看到默认apache test page
        页面,即表示成功启动。*
        *3.4.配置mysql
        系统已经自动安装好了mysql,但我们需要
        做些简单的修改和优化,配置数据库文件
        和日志存放位置,才能启动。
        在 /usr/share/mysql/目录下有多个my-开头
        的cnf文件,我们可以针对我们自己的情况
        选择一个使用,我们这里选择my-medium.cnf
        把它复制到/etc目录里
        cp /usr/share/mysql/my-medium.cnf /etc/my.cnf
        编辑
        vi /etc/my.cnf
        修改以下配置,在原有的基础上修改,
        没有的选项就添加
        [client]
        port = 3306
        socket = /var/lib/mysql/mysql.sock
        default-character-set = utf8
        [mysqld]
        user = mysql
        datadir = /www/mysql
        log-error = /www/log/mysql/mysql_error.log
        log-bin=/www/log/mysql/mysql-bin
        expire_logs_days=7
        character-set-server = utf8
        --skip-external-locking
        启动mysql
        service mysqld start
        系统会自动安装初始数据库,然后启动,
        如果有错误,请查看/www/log/mysql
        /mysql_error.log里的错误信息
        设置mysql root用户密码
        mysql
        UPDATE mysql.user SET password =
        PASSWORD('你的密码') WHERE user = 'root';
        FLUSH PRIVILEGES;
        exit;
        +++++++++++++++++
        删除mysql一些无用的账号信息,root mysql只
        允许本地链接 安全设置。
        +++++++++++++++++ *
        *4.优化设置*
        *

        4.1.安全设置,禁用 PHP 的敏感函数

        vi /etc/php.ini
        取消disable_functions前的#,改为
        disable_functions = exec,shell_exec,system,popen,escapeshellcmd,
        escapeshellarg,gzuncompress,proc_open,proc_
        get_status,show_source,gzinflate

        4.2.开启gzip压缩

        gzip压缩可以减少服务器流量,但也会增
        加cpu资源消耗,是否要开启你需要
        根据情况决定
        vi /etc/httpd/conf/httpd.conf
        LoadModule deflate_module modules/
        mod_deflate.so
        <IfModule mod_deflate.c>
        DeflateCompressionLevel 6
        AddOutputFilterByType DEFLATE text/
        html text/plain text/xml application/x-httpd-php
        AddOutputFilter DEFLATE js css
        </IfModule>          *
        *5.建立网站*
        *
        创建网站目录
        mkdir /www/htdocs/demo
        更改以下网站目录的属主和属组
        chown -R apache:apache /www/htdocs/demo
        配置虚拟主机配置
        vi /etc/httpd/conf/httpd.conf
        在最后添加
        <VirtualHost *:80>
        ServerName hacktea8.com
        ServerAlias www.hacktea8.com
        DocumentRoot /www/htdocs/demo
        </VirtualHost>
        重启apache 
        service httpd restart
        +++++++++++++++
        本地测试 需要将域名与IP对应  写在本
        地hosts文件
        +++++++++++++++
        创建数据库
        mysql -u root -p
        create database demo; #demo为要创建的
        数据库名
        exit;
        环境搭建已经全部完成了,下面您只需要
        把Web网站程序上传到/www/htdocs/demo,
        并把您的域名解析到您的服务器ip,即可
        完成Web网站的安装,本教程到此结束。*
        &&&&&&&&&&&&&&&&&&&&&&&&&&&&&&&&&&&&&&&&&&&&&&&&&&&&&&

        **使用HTML5开发))~WebApp性能注意点*!~

        ****使用HTML5开发))~WebApp性能注意点*!~ 

        *PhoneGap HTML5 应用简介
        PhoneGap是一个   
        用基于HTML,CSS
        和JavaScript的,   
        创建移动跨平台移
        动应用程序的快速
        开发平台。它使开
        发者能够利用iPhone,
        Android,Palm,
        Symbian,WP7,Bada
        和Blackberry智能
        手机的核心功能——包括地理定位,加速器,
        联系人,声音和振动等,此外PhoneGap拥有
        丰富的插件,可以以此扩展无限的功能。
        PhoneGap是免费的,但是它需要特定平台提供
        的附加软件,例如iPhone的iPhone SDK,
        Android的Android SDK等,也可以和DW5.5配
        套开发。使用PhoneGap只比为每个平台分别 
        建立应用程序好一点点,因为虽然基本代码是
        一样的,但是你仍然需要为每个平台分别  
        编译应用程序。*

        *PhoneGap WebApp分析
        我们分析了目前Google play, 安卓市场,豌豆荚
        市场,机锋市场的下载量前300名的应用,以及
        每个分类的前50名的应用进行分析,发现以下 
        7个应用采用了PhoneGap开发:
        **
        *来自国内市场的有5个应用.当然,还有更多的 
        纯HTML5应用程序没有计算在内,也没有计算 
        来自iOS的phoneGap应用。*

        *分析工具WAPA介绍
        我们将上述的PhoneGap应用全部使用了WAPA 
        进行分析,WAPA是Web Application Performance
        Analyzer(Web应用性能分析器)的简称,其来源于
        Intel软件与服务部门全球合作伙伴关系事业  
        部HTML5应用团队的创新项目。旨在给开发者 
        提供如何编写高性能HTML5应用程序提供 
        代码级别的建议*

        *WAPA对HTML5应用分析过程如图所示*
        **

        *1.    首先解包目标Web应用的安装包;
        2.    接下来解析相应的源代码文件(.html, .js. .css)
        3.    如果是JS文件,则生成相应的语法树;如果是 
        html和CSS文件,则静态解析文件;
        4.    将解析后的文件或者语法树和WAPA中预置 
        的优化规则进行匹配和识别;
        5.    根据匹配和识别的结果生成相应的report,
        供开发者选择**

        *我们对目前采用PhoneGap开发的App使用 
        WAPA分析之后,得出一些通用性的结论,
        提供给开发者,供大家在开发PhoneGap App时参考*

        *性能注意点介绍
        经过WAPA优化规则的分析,我们得到了在
        PhoneGap开发中性能优化的一系列的通用性
        性能问题点,经过分析之后,以下六条规则
        是在PhoneGap App中经常遇到的性能可以
        得到优化的点:
        *
        *1.      将for循环条件语句中的.length属性存入
        一个局部变量
        该规则是指:在使用循环的时候,要尽量避免
        使用for in, 除非是在一个不明确的对象里面,
        需要迭代其内部对象。如果已经知道其结构和
        内容数据类型,避免使用for in。在循环中,
        将i.length存储为局部变量,可以提高for循环的
        效率。从下列三个算法的测试结果即可看出 **

        *算法一,使用for in,:
        var i=0
        for (i in geo){
               document.write("The country is " +
        geo[i] +"<br />")
        }
        运行时间结果是最长的,即最没有效率的:(24ms)*

        *算法二,for循环
        for (var i=0 ; i < geo.length; i++){
               document.write("The country is " +
        geo[i] +"<br />")
        }
        运行时间结果,比较有效率(17ms)*

        *算法三 for循环,将i.length存储为局部变量
        for (var i=0, len=geo.length; i < len; i++){
               document.write("The country is " +
        geo[i] +"<br />")
        }
        运行时间结果,最高效。(14ms)*

        *2.      用className属性取代其他style属性
        在给静态的DOM元素添加样式的时候,有以下
        三种写法,分别是系列的.css()、单独.css() 
        写法,或者使用.addClass()方法,给元素添加
        类名之后,在CSS文件中,添加样式**
        *下图是我们在不同平台测试出来的结果,分别
        对应不用的Web Runtime,在移动手机端,
        结论是一样的 *
        **
        *读者可以通过下面的链接亲自感受一下上述三种
        写法带来的性能差异:http://jsperf.com/class-ywq*

        *3.      appendChild()的部分使用document 
        fragments来修改DOM元素
        当我们需要对DOM元素进行一系列操作时,
        可以通过document fragments来减少重绘和重排
        的次数。它可以在当前DOM之外构建一个子树
        ,对齐进行修改之后,再把它拷贝回文档 *
        *其具体使用示例代码如下:
        * var fragment = document.createDocumentFragment();
        appendDataToElment(fragment, data);
        document.getElementById("mylist").appendChild(fragment);  *

        *4.      CSS 中将 2D的CSS变化转化为 3D的CSS
        变换CSS的变换正在变得越来越强大,3D的
        CSS变换已经能够非常完整地支持GPU硬件加速
        ,而传统的2D CSS转换仍然无法使用GPU进行
        加速,导致的结果就是2D的CSS转换比3D CSS转
        换还要慢。我们建议开发者,将2D的CSS变换更
        改为Z轴为0的3D CSS转换,以便充分利用GPU的
        硬件特性 *

        *5.      在HTML文档中,将inline的 JavaScript
        代码转化为独立的JavaScript文件 
        虽然JavaScript是动态解释执行的语言,绝大
        多数的Web Runtime为了提高JavaScript的解释
        执行时间,都会将JavaScript进行预编译为一个
        中间态的文件。WebKit,IE10等都不例外。
        但是HTML文档中的JavaScript代码是无法被预
        编译为中间态文件的,这会显著减低执行效率
        和时间,所以我们强烈建议PhoneGap的开发
        人员将HTML中的JavaScript代码剥离出来,
        放入单独的JavaScript文件中 *

        *6.      由于脚本的阻塞特性,将JavaScript脚本放
        在文件的最底端以及成组加载 
        由于每个<script>标签在下载时都会阻塞页面
        解析的过程,所以限制页面<script>总数也可以
        改善性能。所以成组加载JavaScript脚本可以
        提升页面整体性能,这个规则不仅对内联脚本
        有效,对外部脚本同样适用  **

        #*原因是在于每个HTTP 请求都会产生额外的性能
        负担,下载一个100KB的脚本远比下载4个25KB 
        的脚本要快*#

        *同时将页面和页面初始化无关的JavaScript文件 
        放在页面的最低端进行加载都可以提高性能*

        *结论
        随着HTML5的井喷式发展,使用PhoneGap开发
        的本地应用程序也将会越来越多。性能问题是 
        广大开发者最为关心的一个使用HTML5开发 
        App的担忧。本文分析和总结了目前市面上的 
        PhoneGap 应用程序,使用WAPA工具对其进行 
        了性能分析,得出六点PhoneGap开发应用程序 
        经常出现的性能优化点。供广大PhoneGap  
         HTML5开发者参考 *index CSS*
        *


        新增說明文字


        /*  Licensed to the Apache Software Foundation (ASF) under one
          or more contributor license agreements.
         See the NOTICE file
          distributed with this work for
        additional information
          regarding copyright ownership. 
        The ASF licenses this file
          to you under the Apache License,
        Version 2.0 (the
          "License");
        you may not use this file
        except in compliance
          with the License.
         You may obtain a copy of the License at
          Unless required by
        applicable law or agreed to in writing,
         
        software distributed under the License is distributed on an
          "AS IS" BASIS,
        WITHOUT WARRANTIES OR CONDITIONS OF ANY
          KIND,
         either express or implied.  See the License for the
          specific language governing
        permissions and limitations

         under the License.
        */
        body {
          background-color:#F6F4F2;

         font-family:"Helvetica Neue", Helvetica, Arial, sans-serif;
          font-size:16px;
        }
        h1, ul,
         li {
          margin:0px;
          padding:0px;
        }
        #header
        {
          background-color:#515151;
          background:#515151 -webkit-gradient(
            linear,
            left top,
            left bottom,
           
        color-stop(0.2, #515151),
            color-stop(0.8, #302F2D)
          );
          background:-moz-linear-gradient
        (center bottom , #515151 20%, #747474 80%);

         border-top:1px solid #919192;
          height:32px;
          left:0px;
          position:fixed;
          top:0px;
          width:100%;
         
        z-index:1;
        }
        #subheader {
          background-color:#CBCBCB;

         background:-webkit-gradient(linear,
            left top,
            left bottom,
            color-stop(0.0, #F9F9F9),
          
         color-stop(1.0, #CBCBCB)
          );
          background:-moz-linear-gradient
        (center bottom , #CBCBCB 0%, #F9F9F9 100%);
          border-top:1px solid #383A3C;
         
        border-bottom:1px solid #919395;
          height:32px;
          left:0px;
         
        position:fixed;
          top:32px;
          width:100%;
          z-index:1;
        }
        #sidebar
         {
          background-color:#ECEAE7;
          bottom:0px;
          left:0px;
          overflow:auto;

         padding:20px 40px 0px 0px;
          position:fixed;
          text-align:right;
          top:66px;
         
        width:180px;
          z-index:1;
        }
        #scrollable
         {
          bottom:0px;
          left:220px;
          position:fixed;
          overflow:auto;
          right:0px;
          top:64px;
        }
        #content
        {
        /*  top:64px;*/
        /*  bottom:0px;*/
        /*  right:0px;*/
        /*
          left:220px;*/
        /*
          margin:64px auto 0px 220px;*/
         
        margin:20px 60px;
        /*  position:absolute;*/
        /*  overflow:auto;*/
         
        z-index:0;
        }
        #header h1,
        #header h1 a,
        #subheader h1 {
          color:#F6F4F2;
          font-size:18px;
          font-weight:normal;
         
        line-height:32px;
          margin:0px;
          text-align:center;
          text-shadow:0px -1px 1px #222222;
        }
        #header h1 a strong
        {
          font-weight:bold;
        }
        #header h1 {
          text-align:left;
          margin-left:20px;
        }
        #subheader h1
        {
          color:#000000;
          text-
        shadow:#FFFFFF 0px 1px 0px;
        }
        #header small,
        #subheader small
        {
          color:#EFEFEF;
          font-size:14px;
          line-height:32px;
          position:absolute;
          top:0px;
          right:20px;
          text-shadow:-1px 1px 1px #666666;
        }
        #sidebar .vertical_divider
         {
          background-color:#CCCCCC;
          bottom:0px;
         
        border-right:1px solid #FFFFFF;
          position:absolute;
          top:0px;
          right:0px;
          width:1px;
        }
        #sidebar h1
        {
          color:#000000;
          font-size:18px;
          padding:0px;
          margin:30px 0px;
          font-weight:normal;
          text-shadow:#FFFFFF 0px 1px 0px;
        }
        #sidebar ul,
        #sidebar li
         {
          margin:0px;
          padding:0px;
        }
        #sidebar li,
        #sidebar li a {
          color:#767573;
          font-size:14px;
          list-style:none;
          margin:15px 0px;
          text-shadow:#FFFFFF 0px 1px 1px;
        }
        #sidebar li a
        {
          -webkit-transition:color .15s ease-out;
          -moz-transition:color .15s ease-out;
          -o-transition:color .15s ease-out;
        }
        #sidebar li a:hover
         {
          color:#242220;
          -webkit-transition:color .15s ease-in;
          -moz-transition:color .15s ease-in;
          -o-transition:color .15s ease-in;
        }

        #otherbar
         {
          display:none;
        }
        #content
        {
          font-size:13px;
          line-height:160%;
          max-width:750px;
        }
        #content h1
        {
          border-bottom:2px solid;
          font-size:2em;
          font-weight:normal;
          margin:2.0em 0px 1.3em 0px;
          padding-bottom:0.6em;
        }
        #content h2 {
          color:#242220;
          font-size:1.4em;
          font-weight:bold;
          margin:1.3em 0px 0.8em 0px;
          text-shadow:#FFFFFF 0px 1px 1px;
        }
        #content h3
         {
          font-size:1.1em;
          font-weight:bold;
          margin:0.8em 0px 0.5em 0px;
          text-shadow:#FFFFFF 0px 1px 1px;
        }
        hr
         {
          display:none;
          border:none;
          margin:40px 0px;
          border-top:1px solid #CCCCCC;
          border-bottom:1px solid #FFFFFF;
        }
        p,blockquote,pre,ul
         {
          margin:1em 0px;
        }
        h2:after,
        h3:after
         {
         content: ":";
        }
        blockquote
         {
          color:#767573;
         font-style:normal;
          margin-left:35px;
          padding-left:20px;
         position:relative;
         text-shadow:#FFFFFF 0px 1px 0px;
        }
        blockquote code
         {
         font-style: normal;
        }
        blockquote p
         {
          padding:10px 0px;
        }
        blockquote::before
         {
          font-style: normal;
          content: '\201C';
          font-size: 450%;
          font-family:Georgia, Palatino,
         'Times New Roman', Times;;
          position: absolute;
          left: -25px;
          top:0.3em;
          color: #E0E0E0;
        }
        ul
         {
          margin-left:40px;
        }
        ul > li {
         list-style:disc;
         list-style-position:outside;
        }
        ul ul
         {
          margin-bottom:0.5em;
          margin-top:0.5em;
        }

        code
         {
         font-family:"DejaVu", "Monaco", "Courier New", "Courier";
         font-size:90%;
         padding:2px 4px;
         white-space:pre-wrap;;
        }
        pre
         {
        /*    border:1px solid #CCCCCC;*/
            background:#F2F0EE;
            -webkit-border-radius:11px;
            -moz-border-radius:11px;
            border-radius:11px;
            display:block;
            line-height:110%;
            margin:1.5em 0px 3em 0px;
            padding:15px 20px;
            white-space:pre-wrap;
        }
        pre code {
          background:none;
         border:none;
         font-size:11px;
         padding:0px;
        }
        a[href] {
        /*  color:inherit;*/
          color:#F06433;
          text-decoration:none;
          text-shadow:#FFF 0px 1px 0px;
        }
        a[href]:hover
        {
          color:#d0410f;
        }
        .prettyprint a[href],
        .prettyprint a[href]
         span {
          text-decoration:underline;
          text-shadow:none;
        }
        .prettyprint a[href]
         :hover,
        .prettyprint a[href]
         span :hover {
          text-decoration:none;
        }
        code a[href]
         {
          color:inherit;
        /*
          border-bottom:1px dotted #000000;*/
          text-decoration:underline;
        }
        code a[href]:hover {
          color:inherit;
          text-decoration:none;
        }
        a[href].external:after {
         content: "*";
         font-style: super;
         opacity: .5;
        }
        #index {
         -webkit-column-width: 235px;
         -webkit-column-rule-width: 5px;
         -moz-column-width: 235px;
         -moz-column-rule-width: 5px;
         column-width: 235px;
         column-rule-width: 5px;
        }
        #index h2:after,
        #index h3:after
         {
          content:"";
        }
        #index h2
         {
          margin:0px;
          padding:0px;
        }
        #index
         {
          padding: 10px 1px;
        }
        #index ul
         {
         margin:0px 0px 30px 0px;
         padding:0;
        }
        #index ul li
         {
         list-style: none;
        }
        #index ul li a {
        }
        #home h1
         {
          border-bottom:1px solid #919395;
          padding-bottom:20px;
          margin:30px 0px;
        }
        #home h2
         {
          font-weight:normal;
          margin:0px 0px 10px 0px;
          padding:0px;
        }
        #home h2:after
         {
          content:'';
        }
        #home h2
         a {
          text-shadow:#FFFFFF 0px 1px 1px;
        }
        #home span {
          color:#8B8078;
          font-size:14px;
          text-shadow:#FFFFFF 0px 1px 0px;
        }
        #home ul {
          float:left;
          margin:0px;
          padding:0px;
        }
        #home ul li {
          float:left;
          height:120px;
          list-style:none;
        *

        moblie CSS *
        *
        /* Licensed to the Apache Software Foundation (ASF) under one
          or more contributor license agreements.
         See the NOTICE file
          distributed with this work for additional information
          regarding copyright ownership.  The ASF licenses this file
          to you under the Apache License, Version 2.0
         (the
          "License"); you may not use this file except in compliance
          with the License.  You may obtain a copy of the License at

          Unless required by applicable law or agreed to in writing,
          software distributed under the License is distributed on an
          "AS IS" BASIS, WITHOUT WARRANTIES OR CONDITIONS OF ANY
          KIND, either express or implied.  See the License for the
          specific language governing permissions and limitations
          under the License.
        */
        body {
          margin:0px;
          padding:0px;
        }
        #header
         {
          position:static;
        }
        #header h1 {
          margin:0px;
          text-align:center;
        }
        #subheader
         {
          position:static;
          text-align:center;
        }
        #subheader h1
         {
          display:none;
        }
        #subheader small
         {
          position:static;
        }
        #sidebar
         {
          display:none;
        }
        #scrollable {
          position:static;
        }
        #content
         {
          margin:0px;
          max-width:none;
          padding:10px;
          position:static;
        }
        #home,
        #index
         {
          margin:0px 10px;
        }
        #home h1,
        #index h2
         {
          border:none;
          color:#CCCCCC;
          font-size:20px;
          font-weight:bold;
          margin:10px 0px;
          padding:0px;
          text-shadow:#FFFFFF 0px 1px 0px;
        }
        #home h2 a,
        #index ul li a
         {
          text-shadow:#FFFFFF 0px 1px 1px;
        }
        #home ul,
        #index ul
         {
          background-color:#F9F9F9;
          border:1px solid #CCCED0;
          -moz-border-radius:6px;
          -webkit-border-radius:6px;
          border-radius:6px;
          display:block;
          margin:0px 0px 20px 0px;
          padding:0px;
          float:none;
        }
        #home ul li,
        #index ul li
         {
          border-bottom:1px solid #CCCED0;
          display:block;
          float:none;
          height:100%;
          margin:0px;
          padding:0px;
          width:100%;
        }
        #home ul li:last-child,
        #index ul li:last-child
         {
          border-bottom:none;
        }
        #home li h2
         {
          margin:0px;
          padding:0px;
        }
        #home li h2 a,
        #index li a
         {
          background:url(arrow.png) no-repeat 100% 50%;
          color:#66686A;
          display:block;
          font-size:16px;
          font-weight:normal;
          margin:0px;
          padding:10px 20px;
        }
        #home li span
         {
          display:none;
        }
        #index {
         -webkit-column-width: auto;
         -webkit-column-rule-width: auto;
         -moz-column-width: auto;
         -moz-column-rule-width: auto;
         column-width: auto;
         column-rule-width: auto;
        }                                              *


        &&&&&&&&&&&&&&&&&&&&&&&&&&&&&&&&&&&&&&&&&&&&&&&&&&&&&&&&&&&&&&&&&&&&&&&&

        2013年6月9日 星期日

        **Android开发中的多线程编程技术*~

        **Android开发中
        的多线程编程技术*~

        *多线程这个令人生畏的“洪水猛兽”,很多人谈起多线程都心存畏惧。
        在Android开发过程中,多线程真的很难吗?多线程程序的“麻烦”源于 
        它很抽象、与单线程程序运行模式不同,但只要掌握了它们的区别, 
        编写多线程程序就会很容易了。下面让我们集中精力开始学习吧*

        *多线程案例——计时器*
        *举一个计时器的案例,因为计时器案例是多线程的经典应用。
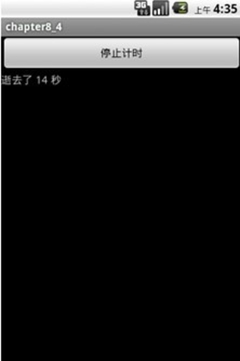
          这个案例中,屏幕启动之后,进入如  
        图8-1所示的界面。*
        *屏幕上有一个文本框用于显示逝去的时间,
        此外还有一个“停止计时”按钮。案例的用
        例图如图8-2所示。

          
          ▲图8-1 计时器界面


         ▲图8-2 计时器用例图
          能够在屏幕上“实时地显示”时间的
        流逝,单线程程序是无法实现的,必须要
        多线程程序才可以实现,即便有些计算机
        语言可以通过封装好的类实现这一功能,
        但从本质上讲这些封装好的类就是封装
        了一个线程。
          综上所述,完成本案例用到的
        知识及技术如下:
          1)进程和线程的概念;
          2)Java中的线程,在Java中创建
        线程的方式;
          3)Android中的线程,包括:Message
        、Handler、Looper和HandlerThread等概念。
          线程究竟是什么?在Windows
        操作系统出现之前,个人计算机上的
        操作系统都是单任务系统,只有在大型
        计算机上才具有多任务和分时设计。
        Windows、Linux操作系统的出现,把原
        本只在大型计算机才具有的优点,带到
        了个人计算机系统中。
          进程概念
          一般可以在同一时间内执行多个程序
        的操作系统都有进程的概念。一个进程就
        是一个执行中的程序,而每一个进程都有
        自己独立的一块内存空间、一组系统资源。
        在进程的概念中,每一个进程的内部数据
        和状态都是完全独立的。在Windows操作
        系统下我们可以通过〈Ctrl+Alt+Del〉
        组合键查看进程,在UNIX和Linux操作
        系统下是通过PS命令查看进程的。
        打开Windows当前运行的进程,
        如图8-3所示。
          Android开发中的多线程编程技术


          ▲图8-3 Windows操作系统进程
          在Windows操作系统中一个进程就是
        一个exe或dll程序,它们相互独立,互相
        也可以通信,在Android操作系统中进程
        间的通信应用也是很多的。
          线程概念
          多线程指的是在单个程序中可以同时
        运行多个不同的线程,执行不同的任务。
        多线程意味着一个程序的多行语句可以看
        上去几乎在同一时间内同时运行。
          线程与进程相似,是一段完成某个特
        定功能的代码,是程序中单个顺序的流
        控制。但与进程不同的是,同类的多个
        线程共享一块内存空间和一组系统资源,
        所以系统在各个线程之间切换时,资源占
        用要比进程小得多,正因如此,线程也被
        称为轻量级进程。一个进程中可以包含
        多个线程。图8-4所示是计时器程序进程
        和线程之间的关系,主线程负责管理子
        线程,即子线程的启动、挂起、停止等操作。
          Android开发中的多线程编程技术


         ▲图8-4 进程和线程关系

          Java中的线程
          Java的线程类是java.lang.Thread类。
        当生成一个Thread类的对象之后,一个新
        的线程就产生了。Java中每个线程都是
        通过某个特定Thread对象的方法run()来
        完成其操作的,方法run( )称为线程体。
          下面是构建线程类几种常用的方法:
          public Thread()
          public Thread(Runnable target)
          public Thread(Runnable target,
         String name)
          public Thread(String name)
          参数target是一个实现Runnable接口的
        实例,它的作用是实现线程体的run()方法。
        目标target可为null,表示由本身实例来
        执行线程。name参数指定线程名字,但
        没有指定的构造方法,线程的名字
        是JVM分配的,例如JVM指定
        为thread-1、thread-2等名字。
          1、Java中的实现线程体方式1
          在Java中有两种方法实现线程体:
        一是继承线程类Thread,二是实现
        接口Runnable。
        下面我们先看看继承线程类Thread方式。
          如果采用第1种方式,它继承线程类
        Thread并重写其中的方法 run(),在初始化
        这个类实例的时候,目标target可为null,
        表示由本实例来执行线程体。由于Java只
        支持单重继承,用这种方法定义的类不能
        再继承其他父类,例如代码清单8-1,
        完整代码请参考chapter8_1工程
        中chapter8_1代码部分。
          【代码清单8-1】
        public class chapter8_1 extends Thread {

            boolean isRunning = true;

            int timer = 0;

            /**
             * 线程体代码
             */
            @Override
            public void run() {
                while (isRunning) {
                    try {
                        Thread.currentThread().sleep(1000);
                        timer++;
                        System.out.println("逝去了 
         "+timer+" 秒");
                    } catch (InterruptedException e) {
                        e.printStackTrace();
                    }
                }
            }
          
            public static void main(String[] args) {

                chapter8_1 t1 = new chapter8_1();

                t1.start();
                System.out.println("计时器启动...");
                BufferedReader br = new BufferedReader(new InputStreamReader(System.in));
                try {
                    String line = br.readLine();
                    if (line.equalsIgnoreCase("1")) {
                        t1.isRunning = false;
                        /*t1.stop();*/
                    }
                } catch (IOException e) {
                    e.printStackTrace();
                }
            }

            }
          在main主方法中通过new chapter8_1()创
        建子线程,并通过t1.start()方法启动子线程,
        main主方法所在线程为主线程,主线程负责
        管理其他的子线程。本例进程、主线程和
        子线程之间的关系如图8-5所示。
          子线程启动之后就开始调用run()方法,
        run()是一个线程体,我们在子线程中处理
        事情就是在这里编写代码实现的。本案例中
        子线程要做的事情就是:休眠1s,计时器加1,
        再反复执行。Thread.currentThread().
        sleep(1000)就是休眠1s。
          为了能够停止线程,我们在主线程中增
        加了一个标识,通过在控制台输入一个字符
          “1”来改变该标识t1.isRunning = false,
        从而结束这个线程。
          注意:
          事实上线程中有一个stop()方法也可以
        停止线程,但是由于这种方法会产生线程死
        锁问题,所以在新版JDK中已经废止了,
        它的替代解决方法就是增加标识,就是我们
        在本例中采用的方案。
          很多人觉得线程难理解,主要有两个问题:
          线程休眠,既然线程已经休眠了,程序
        的运行速度还能提高吗?
          线程体一般都进行死循环,既然线程死
        循环,程序就应该死掉了,就会没有反应。
          1.关于线程休眠问题
          对线程休眠问题头痛的读者,其实还是
        在用单线程的思维模式考虑问题,多数情况
        下我们的PC都是单CPU的,某个时间点只能
        有一个线程运行。所谓多线程就是多个线程
        交替执行就好像同时运行似的。因此,休眠
        当前线程可以交出CPU控制权,让其他的
        线程有机会运行,多个线程之间只有交替
        运行效率才是最高的,这就像我们开车过十
        字路口,只有我等等,让你先过,你再等等
        让他先过,才能保证最高效率,否则就会造
        成交通系统崩溃,对线程情况也是一样的。
        因此,多线程中线程的休眠是程序运行的
        最有效方式。
          2.关于线程体死循环问题
          在单线程中如果是死循环,程序应就
        会死掉,没有反应,但是多线程中线程体
        (run方法)中的死循环,可以保证线程一直
        运行,如果不循环线程,则运行一次就停止了。
        在上面的例子中线程体运行死循环,可以
        保证线程一直运行,每次运行都休眠1s,
        然后唤醒,再然后把时间信息输出到控制台。
        所以,线程体死循环是保证子线程一直运行
        的前提。由于是子线程它不会堵塞主线程,
        就不会感觉到程序死掉了。但是需要注意的
        是有时我们确实执行一次线程体,就不需要
        循环了。
          程序运行后开始启动线程,线程启动后
        就计算逝去的时间,每过1s将结果输出到
        控制台。当输入1字符后线程停止,程序终止

          Java中的实现线程体方式2
          上面介绍继承Thread方式实现线程体,
        下面介绍另一种方式,这种方式是提供一
        个实现接口Runnable的类作为一个线程的
        目标对象,构造线程时有两个带有Runnable 
         target参数的构造方法:
          Thread(Runnable target);
          Thread(Runnable target, String name)。
          其中的target就是线程目标对象了,
        它是一个实现Runnable的类,在构造Thread
        类时候把目标对象(实现Runnable的类)传递给
        这个线程实例,由该目标对象
        (实现Runnable的类)提供线程体run()方法。
        这时候实现接口Runnable的类仍然可以
        继承其他父类。
          请参看代码清单8-2,这是一
        个Java AWT的窗体应用程序,完整代码请
        参考chapter8_2工程中chapter8_2_1代码部分。
          【代码清单8-2】
        public class chapter8_2_1 extends
         Frame implements ActionListener, Runnable {

            private Label label;
            private Button button1;
            private Thread clockThread;
            private boolean isRunning = false;
            private int timer = 0;

            public chapter8_2_1() {
                button1 = new Button("结束计时");
                label = new Label("计时器启动...");
                button1.addActionListener(this);
                setLayout(new BorderLayout());
                add(button1, "North");
                add(label, "Center");
                setSize(320, 480);
                setVisible(true);

                clockThread = new Thread(this);
                /* 线程体是Clock对象本身,线程
        名字为"Clock" */
                clockThread.start(); /* 启动线程 */
                isRunning = true;
            }

            @Override
            public void actionPerformed
        (ActionEvent event) {
                isRunning = false;
            }

            @Override

            public void run() {
                while (isRunning) {
                    try {
                        Thread.currentThread().sleep(1000);
                        timer++;
                        label.setText("逝去了 "
         + timer + " 秒");
                    } catch (InterruptedException e) {
                        e.printStackTrace();
                    }
                }
            }

            public static void main(String args[]) {
                chapter8_2_1 a = new chapter8_2_1();
            }

        }
          其中关于Java AWT知识本书就不在
        这里介绍了,有兴趣的读者可以自己看看
        相关书籍。在本例中构建AWT窗体的应用
        程序方式是继承Frame类。采用第1种方式
        ——继承方式实现线程体是不可以的,因为
        Java是单继承的,这个类不能既继承Frame
        又继承Thread。应该采用第2种方式——实现
        Runnable接口方式。Runnable接口也有一
        个run()方法,它是实现线程体方法,其代码
        处理与上一节是一样。需要注意的是,在第2
        种方法中,创建了一个Thread成员变
        量clockThread,才用构造方法new Thread(this)
        创建一个线程对象,其中创建线程使用的构造
        方法是Thread(Runnable target),其中的this就
        是代表本实例,它是一个实现了Runnable接口
        的实现类。
          程序运行结果如图8-7所示,屏幕开始加载
        的时候线程启动开始计算时间,1s更新一次UI,
        当单击“结束计时”按钮时,停止计时。


          Java中的实现线程体方式3
          实现线程体方式3是实现线程体方式2的
        变种,本质上还是实现线程体方式2,但是在
        Android应用开发中经常采用第3种方式。
        下面我们看第3种方式的计时器代码清单8-3,
        完整代码请参考chapter8_2工程中 
         chapter8_2_2代码部分。
          【代码清单8-3】
        public class chapter8_2_2 extends
        Frame implements ActionListener {

            private Label label;
            private Button button1;
            private Thread clockThread;

            private boolean isRunning = false;
            private int timer = 0;

            public chapter8_2_2() {
                button1 = new Button("结束计时");
                label = new Label("计时器启动...");
                button1.addActionListener(this);
                setLayout(new BorderLayout());
                add(button1, "North");
                add(label, "Center");
                setSize(320, 480);
                setVisible(true);

                /* 线程体是Clock对象本身,线程名字
        为"Clock" */
                clockThread = new Thread(new 
        Runnable() {
                    @Override
                    public void run() {
                        while (isRunning) {
                            try {
                                Thread.currentThread().
        sleep(1000);
                                timer++;
                                label.setText("逝去了 " + timer + " 秒");
                            } catch (InterruptedException e) {
                                e.printStackTrace();
                            }
                        }
                    }
                });

                clockThread.start(); /* 启动线程 */
                isRunning = true;
            }

            @Override
            public void actionPerformed
        (ActionEvent event) {
                isRunning = false;
            }

            public static void main(String args[]) {
                chapter8_2_2 a = new chapter8_2_2();
            }

            }
          与第2种方式比较,我们发现Frame类
        不再实现Runnable接口了,而是在实例化
        Thread类的时候,定义了一个实现Runnable
        接口的匿名内部类:
        clockThread = new Thread(new Runnable() {
                    @Override
                    public void run() {
                        while (isRunning) {
                            try {
                                Thread.currentThread().sleep(1000);
                                timer++;
                                label.setText("逝去了 " + timer + " 秒");
                            } catch (InterruptedException e) {
                                e.printStackTrace();
                            }
                        }
                    }
            });
          有关Java多线程的内容还有很多,
        例如线程优先级、线程同步等,由于这些
        内容与本书关系不是很紧密,所以不再介
        绍了,有关其他的线程知识可以参考Java
        方面的书籍。接下来介绍一下Android中
        的线程。

          Android中的线程
          在Android平台中多线程应用很广泛,
        在UI更新、游戏开发和耗时处理(网络通信等)
        等方面都需要多线程。Android线程涉及的
        技术有:Handler;Message;MessageQueue;Looper;
        HandlerThread。
          Android线程应用中的问题与分析
          为了介绍这些概念,我们把计时器的
        案例移植到Android系统上,按照在Frame
        方式修改之后的代码清单8-4,完整代码请
        参考chapter8_3工程中 chapter8_3代码部分。
          【代码清单8-4】
        public class chapter8_3 extends Activity {

            private String TAG = "chapter8_3";
            private Button btnEnd;
            private TextView labelTimer;
            private Thread clockThread;
            private boolean isRunning = true;
            private int timer = 0;

            @Override
            public void onCreate(Bundle 
        savedInstanceState) {
                super.onCreate(savedInstanceState);
                setContentView(R.layout.main);
              
                btnEnd = (Button) findViewById
        (R.id.btnEnd);
                btnEnd.setOnClickListener(new 
         OnClickListener() {

                    @Override
                    public void onClick(View v) {
                        isRunning = false;
                    }
                });

                labelTimer = (TextView) findView
        ById(R.id.labelTimer);

                /* 线程体是Clock对象本身,线程名字
        为"Clock" */
                clockThread = new Thread(new 
         Runnable() {
                    @Override
                    public void run() {
                        while (isRunning) {
                            try {
                                Thread.currentThread().
        sleep(1000);
                                timer++;
                                labelTimer.setText("逝去了 " 
        + timer + " 秒");
                                Log.d(TAG, "lost  time " + timer);
                            } catch (InterruptedException e) {
                                e.printStackTrace();
                            }
                        }
                    }

                });

                clockThread.start(); /* 启动线程 */

            }
         
          系统抛出的异常信息是
        “Only the original thread that created a 
         view hierarchy can touch its views”,
        在Android中更新UI处理必须由创建它的
        线程更新,而不能在其他线程中更新。
        上面的错误原因就在于此。
          现在分析一下上面的案例,在上面的
        程序中有两个线程:一个主线程和一个子
        线程,它们的职责如图8-10所示。
          由于labelTimer是一个UI控件,它是在
        主线程中创建的,但是它却在子线程中被
        更新了,更新操作
        在clockThread线程的run()方法中实现,
        代码如下:
        /* 线程体是Clock对象本身,线程名字
        为"Clock" */
        clockThread = new Thread(new Runnable() {
            @Override
            public void run() {
                while (isRunning) {
                    try {
                        Thread.currentThread().sleep(1000);
                        timer++;
                        labelTimer.setText("逝去了 " 
         + timer + " 秒");
                        Log.d(TAG, "lost  time " + timer);
                    } catch (InterruptedException e) {
                        e.printStackTrace();
                    }
                }
            }
        });
          这样的处理违背了Android多线程编程
        规则,系统会抛出异常“Only the original 
         thread that created a view hierarchy can 
         touch its views”。
          要解决这个问题,就要明确主线程和
        子线程的职责。主线程的职责是创建、显示
        和更新UI控件、处理UI事件、启动子线程、
        停止子线程;子线程的职责是计算逝去的时间
        和向主线程发出更新UI消息,而不是直接
        更新UI。
          主线程的职责是显示UI控件、处理UI
        事件、启动子线程、停止子线程和更新UI,
        子线程的职责是计算逝去的时间和向主线程
        发出更新UI消息。但是新的问题又出现了:
        子线程和主线程如何发送消息、如何通信呢?
          在Android中,线程有两个对象—消息
        (Message)和消息队列(MessageQueue)可以
        实现线程间的通信。下面再看看修改之后
        的代码清单8-5,完整代码请参
        考chapter8_4工程中chapter8_4代码部分。
          【代码清单8-5】
        public class chapter8_4 extends Activity {

            private String TAG = "chapter8_3";
            private Button btnEnd;
            private TextView labelTimer;
            private Thread clockThread;
            private boolean isRunning = true;
            private Handler handler;

            @Override
            public void onCreate(Bundle
        savedInstanceState) {
                super.onCreate(savedInstanceState);
                setContentView(R.layout.main);

                btnEnd = (Button) findViewById(R.id.btnEnd);
                btnEnd.setOnClickListener(new 
         OnClickListener() {

                    @Override
                    public void onClick(View v) {
                        isRunning = false;
                    }
                });

                handler = new Handler() {

                    @Override
                    public void handleMessage(Message msg) {
                        switch (msg.what) {
                        case 0:
                            labelTimer.setText("逝去了 " 
        + msg.obj + " 秒");
                        }
                    }

                };

                labelTimer = (TextView) findViewById
        (R.id.labelTimer);

                /* 线程体是Clock对象本身,线程名字
        为"Clock" */
                clockThread = new Thread(new 
        Runnable() {
                    @Override

                    public void run() {
                        int timer = 0;
                        while (isRunning) {
                            try {
                                Thread.currentThread().sleep(1000);
                                timer++;
                                /* labelTimer.setText("逝去了 " + timer + " 秒"); */
                                Message msg = new Message();
                                msg.obj = timer;
                                msg.what = 0;
                                handler.sendMessage(msg);
                                Log.d(TAG, "lost  time " + timer);
                            } catch (InterruptedException e) {
                                e.printStackTrace();
                            }
                        }
                    }
                });

                clockThread.start(); /* 启动线程 */

            }
          有的时候为了将Android代码变得更加
        紧凑,把线程的创建和启动编写在一条语句
        中,如下面chapter8_5的代码片段。代码清
        单8-6所示,完整代码请参考chapter8_5工程
        中 chapter8_5代码部分。
          【代码清单8-6】
        new Thread() {
                @Override
                public void run() {
                    int timer = 0;
                    while (isRunning) {
                        ry {
                            Thread.currentThread().sleep(1000);
                            timer++;
                            / labelTimer.setText("逝去了 "
         + timer + " 秒");
                            Message msg = new Message();
                            msg.obj = timer;
                            msg.what = 0;
                            handler.sendMessage(msg);
                            Log.d(TAG, "lost  time " + timer);
                        } catch (InterruptedException e) {
                            e.printStackTrace();
                        }
                    }

                }
            }.start();
          chapter8_5代码看起来有些糊涂吧?
        chapter8_4和chapter8_5创建线程的区别是:
        chapter8_4采用Thread(Runnable target)构造
        方法创建一个线程,需要提供一个Runnable
        接口对象,需要提供的参数是实现了Runnable
        接口的匿名内部类对象。chapter8_5采用
        Thread()构造方法创建一个线程,在这里采用
        了简便的编程方法,直接新建一个Thread类,
        同时重写run()方法。
          chapter8_5编程方法虽然晦涩难懂,
        而且违背了Java编程规范,程序结构也比较
        混乱,但却是Android习惯写法,这主要源于
        Android对于减少字节码的追求。究竟这两种
        方式在性能上有多少差别呢?诚实地讲我没有
        做过测试和求证,在我看来就上面的程序而言
        它们之间不会有太大差别,由于本书要尽可能
        遵守Java编程规范和Android的编程习惯,
        因此 本书中两种编程方式都会采用,
        如果给大家
        带来不便敬请谅解。
          运行模拟器结果如图8-1所示,加载屏幕后
        马上开始计时,也可以单击“停止计时”按钮
        来停止计时。*


        &&&&&&&&&&&&&&&&&&&&&&&&&&&&&&&&&&&&&&&&&&&&&&&&&&&&&&&&&&